Sunday, November 25, 2012

Vintage Mail Box - It's A Chalkboard!

 
Philemon 1:21

Is there anything that can't be made into a Chalkboard?
 

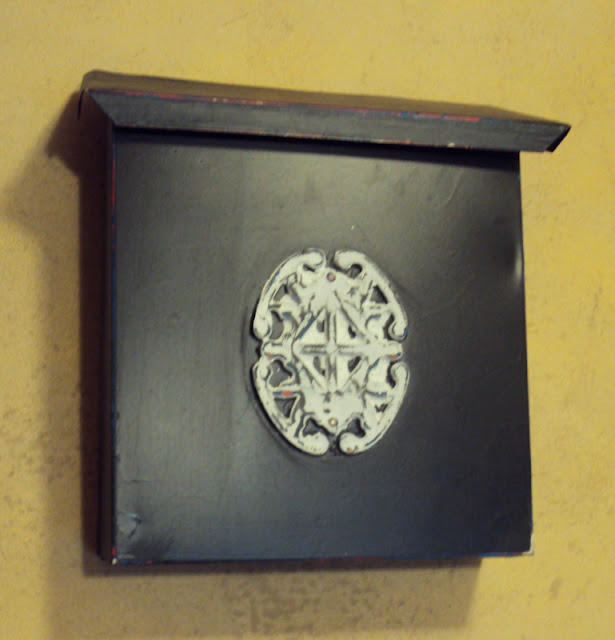
This summer I picked up this Vintage metal Mailbox at a yard sale, it's been sitting in my "stash" ever since. So I decided it was time to put some paint to it!
 
 
After I gave it a coat of Black paint, I thought... sometimes I do that...


Maybe it would look cute, painted with Chalkboard Paint, so you could write messages on it
 

Most of the time these wall mailboxes on a covered porch, or even just used for display inside, so I went for it!


How cute would it be to leave messages for your mailman!


Super Easy Project just used Spray Chalkboard paint, about 3 coats over the base coat of Flat Black


Then painted the front Medallion White, and distressed the whole thing to give it a more aged look


I then "Cured" it, This is an important step, all you need to do is take the side of a piece of chalk and color in all the areas that will be used as a chalkboard. First run the chalk Horizontal, the vertical, and wipe it off. I did this several times. If you don't "cure" it, the first things you write will never go away completely.


Let me know if you have any questions...

 Thank you for visiting with me today, hopefully you have been inspired in some small way...

Please leave a comment so I know you were here, they really do make my day!


If you like it, PIN IT

God's Blessing to you and your families, have a wonderful day!
 
Sharing with:

TheRusticPig

Saturday, November 17, 2012

On the 3rd Day - The 12 Days of Christmas Past

Luke 12:34


On the 3rd Day of Christmas Past, I'm sharing my "Treasure Chest"


This is my little Treasure...


I lined the lid of my Grandfather's old Tool Chest with Christmas Sheet Music, and an Image of Santa from the Graphic Fairy


Filled with Real Pine that I "Faux-Flocked" with white paint


Colored Christmas balls, colored lights, strings of pearls all create the illusion of a Treasure Chest


A few Santa's from my Collection


Let me know if you have any questions...
Thank you for visiting with me today, hopefully you have been inspired in some small way...

Please leave a comment so I know you were here, they really do make my day!

If you like it, PIN IT
God's Blessing to you and your families, have a wonderful day!

Wednesday, November 7, 2012

Rusty Spring Garland - On the 2nd Day of Christmas Past


Luke 1:14


On the 2nd day of Christmas Past I'm sharing my Garland.


Bed Spring "Bell" Garland, Super simple to put together


Shared this Last year on my "old" and "gone" blog, so here it is again


Keeping this one simple, few words, mostly just pictures


After all, isn't that what we really want to see?

 
Let me know if you have any questions... 
 
Thank you for visiting with me today, hopefully you have been inspired in some small way...

Please leave a comment so I know you were here, they really do make my day!

If you like it, PIN IT
 
God's Blessing to you and your families, have a wonderful day!


Sharing with these Great Parties
One More Time Events
Homespun Happenings
Funky Junk's Saturday Nite Special

Monday, November 5, 2012

How to make a Bed Spring Christmas Tree

Matthew 1:21

Bed Spring ChristmasTrees
         How to:


I made 3 Trees, each slightly different


Materials:
  1. 3 Rusty Old Bed Springs (from an old bed)
  2. 3 Rusty Old Small Springs (they were from the Bed also)
  3. 3 Old Clay Pots, aged even more with candle wax and paint
  4. Floral Foam (from the Dollar Tree)
  5. Jute
  6. White Puff Paint (for the snow)
  7. Spanish Moss (from the Dollar Tree)
  8. Moss, (from the Dollar Tree)
  9. Red Berries (from my Yard)
  10. 3 Sticks (from the Yard)
  11. Old Book Pages
  12. Clear Glitter
  13. Spray Adhesive
  14. Hot Glue
  15. 1 sheet of Cardstock
  16. Brown Stamp Pad
As you can see, that's alot of stuff! I already had everything, so I didn't have to go out a buy anything specifically for the project.


Cheap, but messy and time consuming


Double 3D Stars:

I used my Cricut to cut 2 sizes of stars out of cardstock, I cut 6 Large, and 3 small. (The actual book pages were to brittle to run through the Cricut) I then traced the stars on the pages and cut them out by hand and glued them on the cardstock stars.

I made mine double, just make a single sided 3D Star and attached to the front of the bigger ones.

I used the these instructions to make the Stars 3 D, found the instructions via Pinterest, Just like these from:

http://thegluegungirl.blogspot.com/2011/11/how-to-make-3d-cardboard-stars.html

I further aged the book pages using brown stamping ink around the edges, added glitter and puff paint, "snow".
I attached them to the tree top with the small springs and a hot glue gun.


Trees:
I stuck a stick into the foam in a clay pot, and glued the top of a Spring to the top of the stick, and added some "stick" braces here and there to hold it straight.

I added snow to 2 trees by appling puff paint and using a heat gun to activate (puff) the paint. Then added red berries to all 3, sprayed the tress with spray Adhesive and just sort of "patted" the moss around. I covered the foam in the pot with moss also and added a snow around the bottom.

Hot glue a little Jute bow and we have a Spring Tree!


Aged Terra Cotta Pots:
You can use new or old clay pots, just randomly rub a candle over the surface, then paint (I used white paint). Take a clean dry cloth and wipe the paint off, some of the paint will remain giving it that wonderful aged look.


This is really my time doing a post with instructions, so let me know if I missed anything or you have any questions!


Thank you for visiting with me today, hopefully you have been inspired in some small way...

Please leave a comment so I know you were here, they really do make my day!
As always if you like it, PIN IT

God's Blessing to you and your families, have a wonderful day!

Saturday, November 3, 2012

On the 1st Day of Christmas - 12 Days of Christmas Past


I couldn't help but be inspired and tempted by all the Christmas out there in Blogland, and Pinterest. There's some Beautiful things going on out there for Christmas, the most Wonderful time of the year!


Well, I'm not ready to take down my Fall Stuff, yet.  I haven't even shared everything! I hope to get those pictures posted soon.

So I thought I'd share some to the projects and Decor from last Christmas, and maybe beyond
(if I can find any pictures worth posting)


As I may have mentioned before, I lost my original Blog to spam( Finding Secret Treasures),Looks like the same name, huh? almost, I just dropped the "s" on the end, cause they wouldn't let me use the same name.

 I had only been posting for about 6 months. Last years Christmas posts, all gone. Since I can't go back and visit it, I thought I try and recreate it.

I'd like to try and do 12 Posts from Christmas 2011, not 12 days in a row, just 12 Posts between now and December
 (which is when I'll probably start, this years decorating)


The 12 Days of Christmas Past...
On the 1st day of Christmas, I made some Spring Trees
(I guess I should say, Bed Spring Trees)

Easy, but a bit Time Consuming, especially the first one, after I had a "design" in place, the other 2 went a little easier.

I was going list the Materials, and general directions at the Bottom so as not to bore you...then I decided to just put in another post tomorrow


This is really all about the pictures, hope you enjoy~


The pictures are always my favorite part, so I'll just keep quiet and let you look


Thank you for visiting with me today, hopefully you have been inspired in some small way...

Please leave a comment so I know you were here, they really do make my day!
As always if you like it, PIN IT

God's Blessing to you and your families, have a wonderful day!

Sharing with:
http://cherishedhandmadetreasures.blogspot.com/2012/11/creative-corner-hop-37.html

Homespun Happenings TheRusticPig
Beyond The Picket Fence
Funky Junk's Saturday Nite Special