Showing posts with label chalkboard. Show all posts

Sunday, April 7, 2013

Repurposed Dresser Drawer


Only 3 drawers to this dresser survived, (and a huge mirror) so rather than call it a complete loss I wanted to do something special with them. Well so far it's only the one, but I have plans for the others!


Sorry I don't have any pictures of the full dresser, only what survived...


I painted the outside with Chalk paint, a coat of white, then Turquoise, and distressed it some with sandpaper


I love how it turned out! I can use it like this on a tabletop or

 
on the wall, it hangs either horizontal or vertical


I painted the inside with Chalkboard paint, and lined the sides with a yardstick


Below is a picture with my Bed spring Chalk holder


Let me know if you have any questions...

Thank you for visiting with me today, hopefully you have been inspired in some small way...

Please leave a comment so I know you were here, they really do make my day!


If you like it, PIN IT

God's Blessing to you and your families, have a wonderful day!

Sunday, November 25, 2012

Vintage Mail Box - It's A Chalkboard!

 
Philemon 1:21

Is there anything that can't be made into a Chalkboard?
 

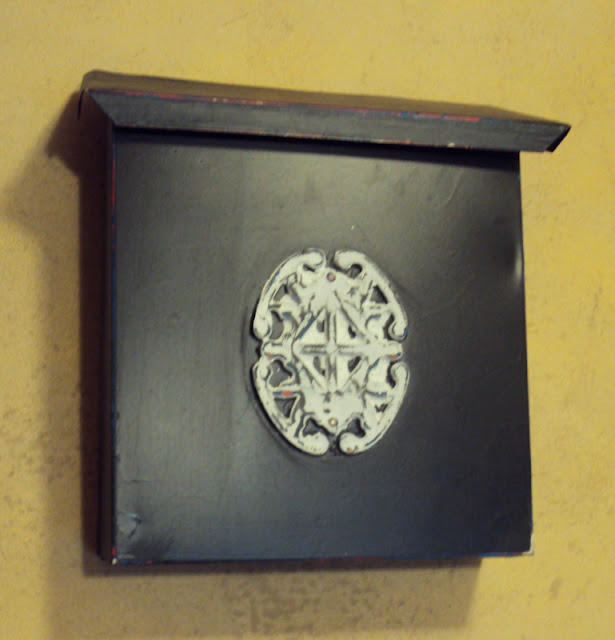
This summer I picked up this Vintage metal Mailbox at a yard sale, it's been sitting in my "stash" ever since. So I decided it was time to put some paint to it!
 
 
After I gave it a coat of Black paint, I thought... sometimes I do that...


Maybe it would look cute, painted with Chalkboard Paint, so you could write messages on it
 

Most of the time these wall mailboxes on a covered porch, or even just used for display inside, so I went for it!


How cute would it be to leave messages for your mailman!


Super Easy Project just used Spray Chalkboard paint, about 3 coats over the base coat of Flat Black


Then painted the front Medallion White, and distressed the whole thing to give it a more aged look


I then "Cured" it, This is an important step, all you need to do is take the side of a piece of chalk and color in all the areas that will be used as a chalkboard. First run the chalk Horizontal, the vertical, and wipe it off. I did this several times. If you don't "cure" it, the first things you write will never go away completely.


Let me know if you have any questions...

 Thank you for visiting with me today, hopefully you have been inspired in some small way...

Please leave a comment so I know you were here, they really do make my day!


If you like it, PIN IT

God's Blessing to you and your families, have a wonderful day!
 
Sharing with:

TheRusticPig

Monday, September 10, 2012

DIY-Chalkborad Wine Glasses and Distressed Holder

Matthew 25:35


DIY-Chalkboard Wine Glasses and Distressed Holder

Brought to you straight from Pinterest! Another direct Steal... So what else is new? and what can't you find on Pinterest?
 
 
A super easy, super cute Project, I've been planning on making these glasses since I first saw them on Pinterest.


When I saw this old wood wine glass holder at the 100 mile yard sale, I knew exactly what I wanted to do with it. I forgot to take a before picture, so here's a "mid-way" picture.
 
 
I applied several coats of white Chalk paint, then a coat of light aqua chalk paint. Then I hand sanded and scuffed it up a bit. I knew I wanted to add some black accents to match the glasses I was going to make to go with it, so I decided to use a french script 
 

I had an un-mounted rubber stamp in a French Script, I didn't even attach it to a base, I wanted it to sort of bend over the edges just a touch.


I used stampin Up Black ink. I love the way it turned out! Can you tell I'm a little surprised? It usually takes me a couple trys to get it right, but this project came together on the first attempt!

 
I used a Final Stencil for the the bottom center, I used the
stampin up ink for this, also 
 

Now on to the glasses, I slipped the top of the glass into a plastic baggie, taped it shut, and taped the stem down to where I wanted the paint to stop.


I gave the tops of the bottoms 3 coats of Chalkboard Spray paint, it drys super fast in the sun, then flipped them over and gave the very bottoms 3 coats


The only chalk I could find was sidewalk chalk, that combined with my not so lovely printing...

 
Ta-Da~ I painted both sides of the bottoms so they could be "decorated" while in the holder, and personalized when in use!


I have a feeling I'll be making more of these!


Thank you for visiting with me today, hopefully you have been inspired in some small way...

Please leave a comment so I know you were here, they really do make my day!
 
As always if you like it, PIN IT
 
God's Blessing to you and your families, have a wonderful day!

Sharing with:
http://www.funkyjunkinteriors.net/2013/01/sns-171-link-up-your-charming.html
http://debbie-debbiedoos.com/a-charleston-weekend-away-and-my-thrifty-duds-for-a-wedding-newbie-party-started.html .png" />

  Photobucketi142.photobucket.com/albums/r87/mmoo1978/LindaBtn.png" /> Photobucket

Tuesday, June 12, 2012

My Little Rusty Fairy Garden

John 20:29
Then Jesus told him, "Because you have seen me, you have believed; blessed are those who have not seen and yet have believed." (NIV)

My very own Fairy Garden, this was so fun to put together. Last summer I had never even heard of a fairy garden, and now I had to have one!


My summer budget is super small this year, so I knew I wouldn't have much money to put into my Fairy Garden, but I really, really wanted one.


So I did what I've come to rely on more and more (since I'm not working right now) I shopped my house and yard, Thrift Stores, and the dollar store.


I purchased the little bird house to use as my Fairy House, a bag of moss,  and 2 African Violets from Giant Eagle for $1.50 each, the little church was .50 at the Thrift Store, for a grand total of $5.50~not too bad...


The plants and Flowers I had, I just gathered and added things and made the Popsicle fence, I had the Welcome sign (I got last year at the Church Rummage sale), and the little Blackboard.


I decided to use this great boiler pot (I think that's what it's called) my sister-in-law gave me several years ago (cause, she knew I would come up with something cute to use it for). It was pretty deep and I wanted to add drainage so I filled it about 3/4 full with mulch (the power line cutter left me a huge pile! so free!) I read (on pinterest of course) to use baby diapers to help absorb water, so on top of the wood chips I opened and layered some baby diapers. They seem to be working and hopefully keeping the water from lying on the bottom of the pot.


The keyhole door is cardboard from my scrapping supplies, the old spring I just had.


I painted this rusty old stand I got when my husband was taking down an old garage, not sure what it used to be, I just thought it was neat and the pan fit in perfectly!


I love this tiny little jeweled candle box, I've had for years...


I made the rusty cross from an old piece of wire, the jax I found the hose handle and spring made a cute little addition, and my Mom's turtle salt shakers are peeking out of the flowers

The small rusty gears are from an antique meat grinder


The old bottle caps are from my sisters Mother-in-law


My Fairy Garden was rather easy, this post was not. Did you ever have a post that was just stalling? I have been trying all week to get this posted. My computer has been crawling and kept freezing when I was downloading the pictures, argh... and then today it crashed. I spent all day on the phone, fixing it, so not what I wanted to do today...


I thought it was all fixed until I went to add some more pictures to the post, and re-arrange them, and I all I can see is a "mock" picture in place of every picture on my computer, so it looks like I'll be spending tomorrow on the phone, also.


So I'm posting, not exactly as I would like it to be, but it's here and I hope you enjoyed the show...


Thank you for visiting with me today, hopefully you have been inspired in some small way...

Please leave a comment so I know you were here, they really do make my day!

As always if you like it, PIN IT

God's Blessing to you and your families, have a wonderful day!


Sharing with:
Funky Junk's Sat Nite Special


I'm a Fan of My 1929 Charmer Blog!
UndertheTableandDreaming
”Debbie
southern hospitality